Monday, October 22, 2012
Tuesday, October 16, 2012
Face Painting 2 - an alternative
So I have also been looking at different faces, especially for the smaller dolls, when painting eyes are quite fiddly. Here's my attempt at using beads. The mouth is a bit scary and certainly lacks the appeal of the painted one.
What do you think?
Hugs
Raewyn
What do you think?
Hugs
Raewyn
Face painting - Lavinia - a quick tutorial
I'm making a few little Lavinia dolls, and up to painting the faces - this is how I do mine:
First, using a Micron Pigma pen .03 I draw the outline of the eye - kind of like a hill with a line underneath it. Than I draw the eyelid. Then I draw in the pupil. As you can see, even though I have painted hundreds of faces over the years, I still make mistakes. I always sew and stuff more heads than I need. So if I'm making 6 dolls, I will make up to 10 heads - always need to have some spare.
Now, time to paint the white of the eye. I am using a fairly thin white fabric paint and a very small 000 brush. Be careful when painting - take your time. If you go over the 'line' as I often do on these very small heads, don't panic too much. You can touch it up later. Now it's really important to wait for the whites to dry...the wet paint clogs up the pens terribly - the pens are expensive, so you have to look after them.
Got them all painted and drying - now take a close look - they're not perfect, but I will fix them up later (and I have the spares! if I don't like the way they are at the end!) Oh and don't forget, there is nothing perfect in Nature!
Right-o. Time to paint the irises. I use a variety of different pens as you can see - always test on a piece of the flesh fabric first. Most of the pens will 'bleed' if you hold the pen on for too long, so use short little 'flicky' strokes for your colour.
Back to your black pen. Draw in the pupil and draw over the eye and draw the eyelashes. Draw a couple of eyebrows. Now I take the time to draw back over any of the black first lines to fix up any places where I was a little careless with the white paint. Looking good!
Draw the mouth now. I usually don't put blush or white dots to the eyes until I have completed the dolll - I like to make the doll come alive when she is fully dressed, with hair and embellishments. But I have completed one to show you. I use a crayon for the cheeks, building up the colour gradually. I always put t little white dot on the eye as well.
Pretty happy with this one - I'll probably put this on a doll!
Have a go yourself - I have developed my own style of face as most dollmakers do - I can recognise a face that I have drawn. You will find your inner artist too, I'm sure.
Hugs
Raewyn
First, using a Micron Pigma pen .03 I draw the outline of the eye - kind of like a hill with a line underneath it. Than I draw the eyelid. Then I draw in the pupil. As you can see, even though I have painted hundreds of faces over the years, I still make mistakes. I always sew and stuff more heads than I need. So if I'm making 6 dolls, I will make up to 10 heads - always need to have some spare.
Now, time to paint the white of the eye. I am using a fairly thin white fabric paint and a very small 000 brush. Be careful when painting - take your time. If you go over the 'line' as I often do on these very small heads, don't panic too much. You can touch it up later. Now it's really important to wait for the whites to dry...the wet paint clogs up the pens terribly - the pens are expensive, so you have to look after them.
Got them all painted and drying - now take a close look - they're not perfect, but I will fix them up later (and I have the spares! if I don't like the way they are at the end!) Oh and don't forget, there is nothing perfect in Nature!
Right-o. Time to paint the irises. I use a variety of different pens as you can see - always test on a piece of the flesh fabric first. Most of the pens will 'bleed' if you hold the pen on for too long, so use short little 'flicky' strokes for your colour.
Back to your black pen. Draw in the pupil and draw over the eye and draw the eyelashes. Draw a couple of eyebrows. Now I take the time to draw back over any of the black first lines to fix up any places where I was a little careless with the white paint. Looking good!
Pretty happy with this one - I'll probably put this on a doll!
Have a go yourself - I have developed my own style of face as most dollmakers do - I can recognise a face that I have drawn. You will find your inner artist too, I'm sure.
Hugs
Raewyn
Sunday, October 14, 2012
Charlotte's Sampler - a new stitchery
I made this sampler for the dear Charlotte for her 21st birthday. I used similar motifs to the other stitcheries and sayings, and did the whole sampler in redwork.
Pattern coming soon.
Hugs
Raewyn
Tuesday, October 9, 2012
Between the Shows
September17 - 20
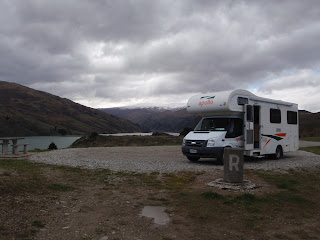
We decided to 'take to the road' for the Dunedin and Invercargill shows
rather than travelling back to Christchurch in between. So we hired a
motorhome and loaded it up with stock and our personal gear and headed
south. After the Dunedin Show we went inland to Cromwell for a night
(Monday night).
Lake Dunstan on the way to Cromwell |
By Lake Wakatipu with Remarkables |
Lunch break at Kingston, Lake Wakatipu |
Camping at Curio Bay |
Set up day we
went to Bluff, had a feed of fresh fish and oysters (as you do in
Bluff), and did our set-up. Brilliant fun - definitely gypsies again next year!!!
The Great New Zealand Craft Show - Invercargill
Invercargill 21 - 23 September
Waiting for opening, Invercargill |
Velodrome, Invercargill |
So after Dunedin we went even further south to Invercargill for the last show of the year. We had a good show, but the venue was a bit of a challenge. We were inside a velodrome, and regularly had cyclists zooming round the track. It was also very hot at times, and the access in and out was not easy. But it was fun and we will definitely do it again next year (as long as the new stadium is ready!)
The Great New Zealand Craft Show - Dunedin
Dunedin 14 - 16 September |
After the Christchurch show we headed south down to Dunedin. We were in the Edgar Centre. It was a great show, but it was sooo cold in the venue ( a large sports arena which often had the doors open and a howling cold southerly blasting through!). It was also lovely to catch up with one daughter who is studying there. Again, great customers, and lovely vendors.
The Great New Zealand Craft Show - Christchurch
Christchurch 7 - 9 September 2012
This is the first time we have done the Christchurch Show. Because of earthquake damage, we were in a large big top tent. We had a fantastic first show back in our home town - lovely customers and lovely other vendors.
Subscribe to:
Posts (Atom)